
Astrophotography and more with the EOS R
A quick note: some of the links below are affiliate links. That means at no additional cost to you, I earn a small commission when you click one of the links and make a purchase. It's an easy way to support me and my family, and costs you nothing extra!
Canon introduced the first RF mount body and lenses in 2018. The first body introduced was the Canon EOS-R full-frame mirrorless camera, and at its initial release, it was met with a lot of differing opinions. Since that time, Canon has shipped four more RF mount bodies (the RP, R5, R6, and R3), but the original R still remains for sale, and can often be had at a great price. The question for photographers today is whether the R is worth the money, and that’s what this article addresses.
When this article was originally written in 2019, the R was brand new and I rented it to see if it worked for what I do, which is mainly astrophotography and landscape photography, but also a little bit of wildlife too. What did I think? I loved it so much I bought one, and have used it as my primary camera since then, up until I bought an R5. The R is now my second body, but I use it all the time. So, I’ve decided to update the article to be a long-term review of the EOS-R. I also own an EOS-RP, and I’ll share some thoughts on that body too.
This isn’t going to be a traditional review of this camera. If you want one of those, there are plenty on the web that focus on the nitty gritty details of the specs and how much it weighs and which ports it has and so forth. Instead, I’m going to focus on my practical experience using the camera, which is ultimately what matters anyways.
Dual card slots and touch bar

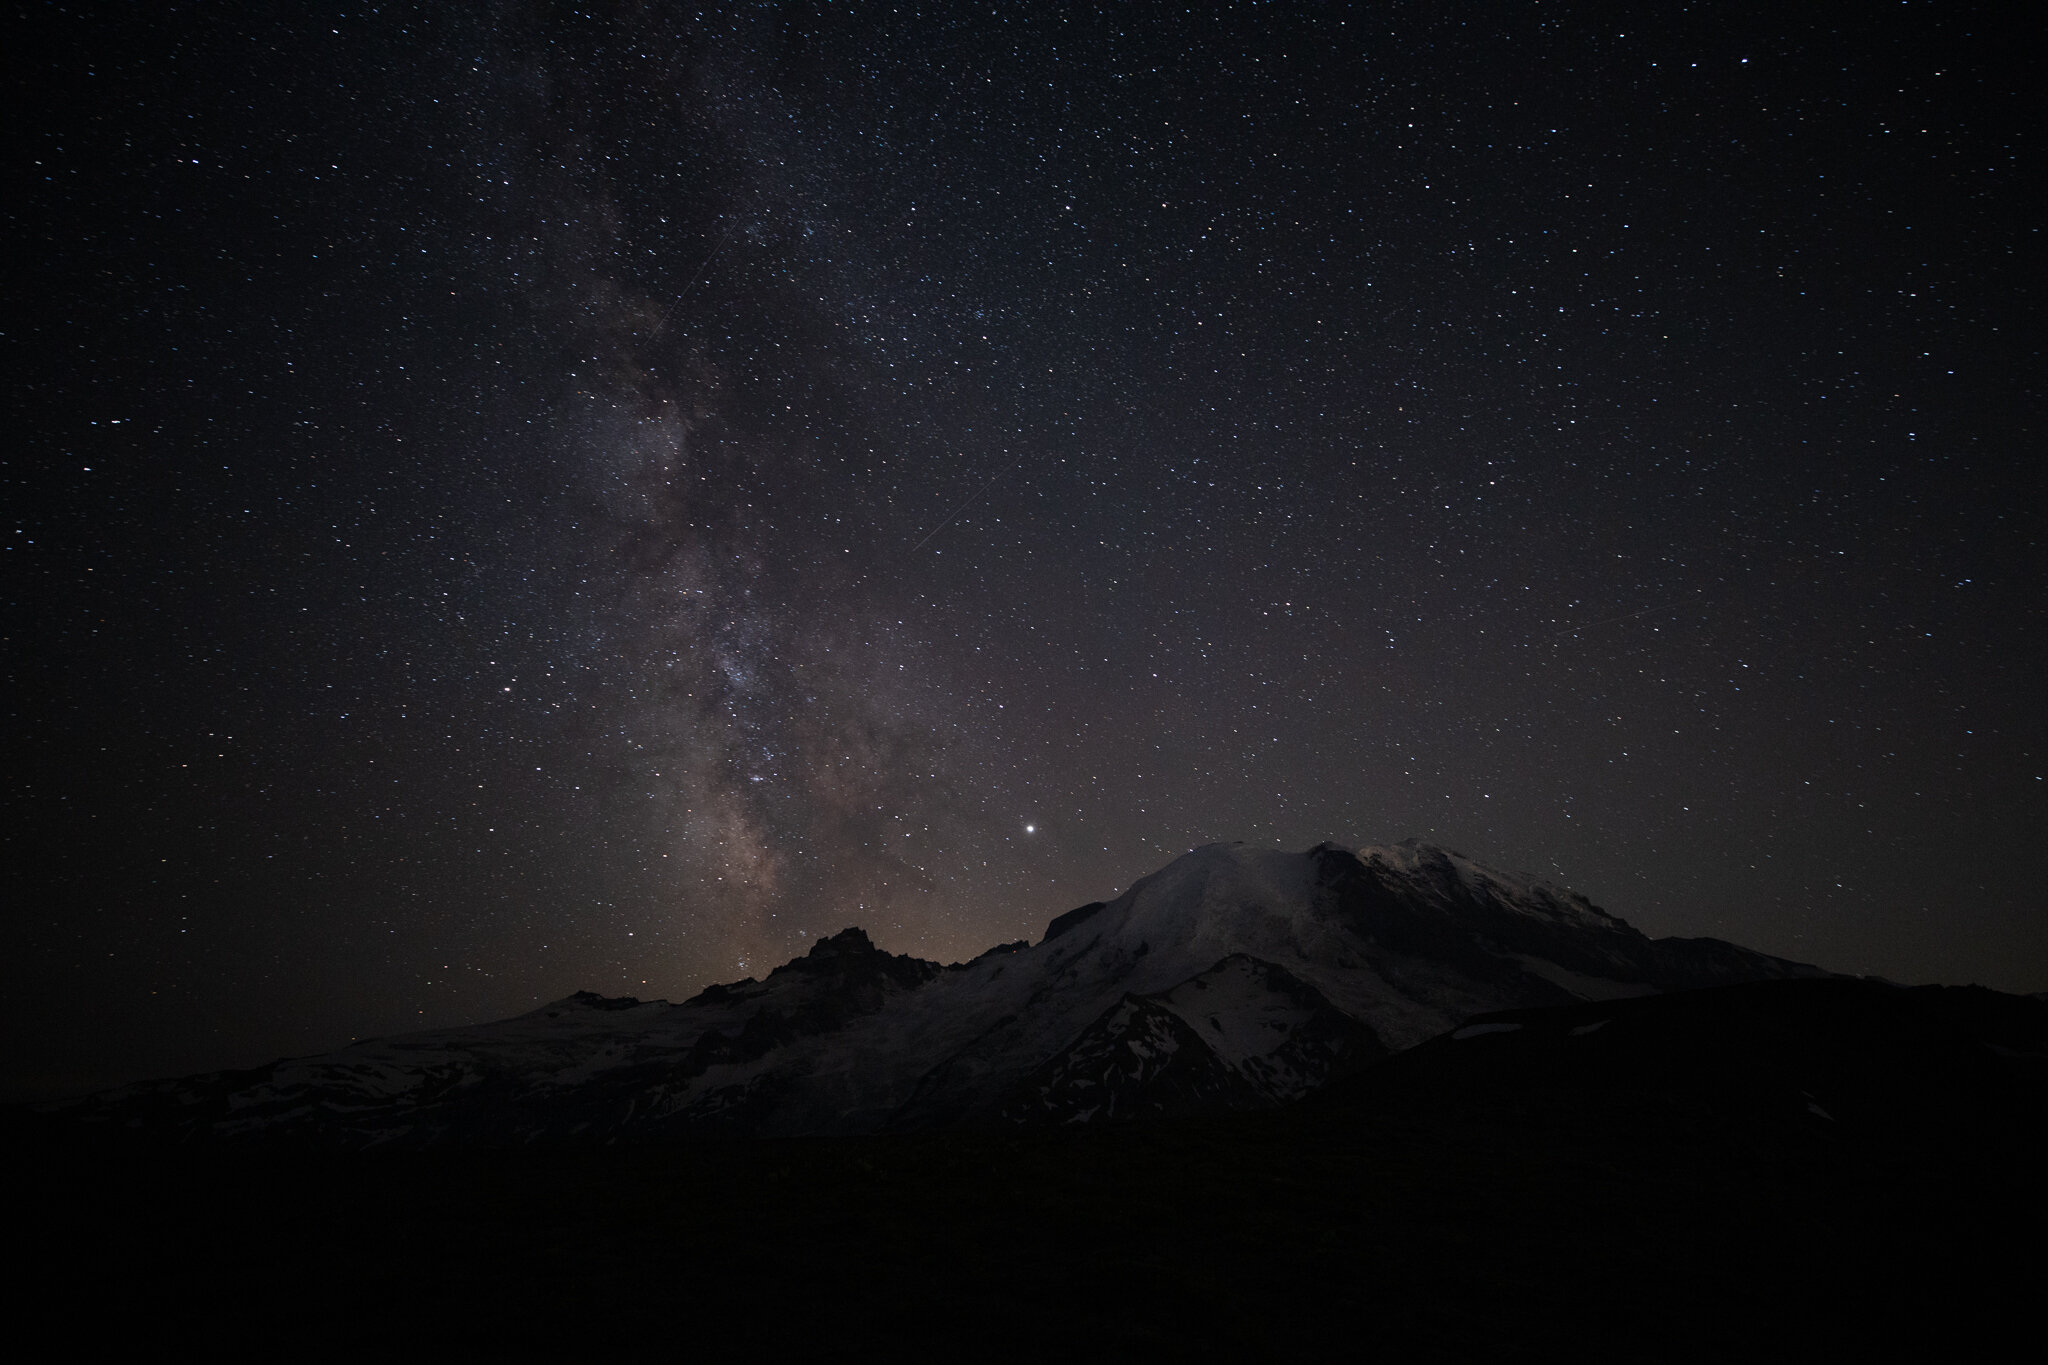
Hazy backlit view of Mt. Rainier. The EOS-R did awesome with this scene, allowing me to precisely adjust the exposure before taking the shot to ensure I wasn’t under or over exposing.
Let’s get the two controversial items out of the way first that were really controversial at announcement time.
First, the lack of dual card slots on the EOS R: I couldn’t care less. I get that this is important to the wedding photography set, but for astro and landscape photography, this seldom matters. Would it suck to lose a card in the field? Of course. But it’s exceedingly rare, and there are other in-field backup solutions that work arguably as well or better for landscape work. I don’t lose sleep over it.
Next, the touch bar. This is the little bar on the back of the camera that is touch sensitive and you can bind to various settings. Many reviewers have labeled it as useless at best, or annoying and in the way at worst. When I first started playing with it, I was a little surprised at how it worked. I was expecting something like the Touch Bar on my MacBook Pro, where it has a little screen that changes what it shows you based on the situation. This is not that. Instead, it shows you nothing and is instead just a touch sensitive pad with no screen. I suppose that makes sense given that you aren’t going to be looking at a little touch sensitive screen when you are looking through the viewfinder, but you do have to know what the bar will control.
Once I got past that and started experimenting with it, I actually started to appreciate it for what it was, and I could see it being useful for some people. The bar has a safety lock that requires you to touch the left side for 2 seconds before it activates. If you end up using the bar, you should use this, or you’re going to end up activating it accidentally. Because of this 2 second delay, it’s wise to bind it to a camera setting that you are okay with changing on a slight delay. One suggestion is to bind the bar to change the ISO sensitivity. Changing the ISO sensitivity on the EOS R requires an extra click on the top panel compared to the 6d or 5d. Initially, I used the bar for this purpose, but over time I found I wasn’t using it as much and haven’t touched it since. If it doesn’t work for you, it can be disabled and left alone without any trouble.
The basics
For me, ergonomics is one of the most important factors in choosing a camera. The camera has to feel good in hand for long periods of time without causing discomfort. In addition, the controls need to feel intuitive and mostly idiot proof. The EOS R checks almost all of those boxes for me. In hand, it feels (and is) slightly smaller than the Canon 6d, and is noticeably smaller than the Canon 5d, but isn’t so small it feels uncomfortable. With my right hand on the side grip, my pinky finger was below the body of the EOS R, whereas it is not on the 6d, so that should give you a feel for the size difference. I didn’t find this uncomfortable, but those with especially large hands might want to consider the battery grip. I haven’t had a chance to try the grip myself.

I intentionally under-exposed most of this image to retain color and detail in the sky, and then recovered the shadows in post. I was pretty impressed with the exposure latitude. There was certainly some noise, but it was very manageable.
Another aspect of ergonomics is the weight of the camera. This camera is noticeably lighter than its DSLR counterparts, but not so light it feels flimsy or tough to control. Too light can also be a problem with some lenses in terms of balance and feel, and I had the opportunity to try it with everything in size from the tiny 50mm f/1.8 nifty fifty all the way up to the enormous 600mm/f4L II and the half-the-weight 600mm/f4L III. For most lenses, this camera feels very comfortable and I didn’t notice a difference in weight balance, so it’s really a non-issue. For the 600mm v2, that lens is something like 13 pounds so it feels wonky no matter what camera you have on it. The 600mm v3 is half the weight of the v2, and I had it mated to the R with the RF to EF control ring adapter and a 1.4x extender and it was wonky, but not unwieldly, especially on a monopod. On a wildlife photography trip, I had the R mounted to the 100-400 v2 with a 1.4x teleconverter and the RF to EF control ring adapter. Although a little front heavy, the setup was really comfortable for three long days of wildlife shooting.
I have two minor gripes about ergonomics that have appeared over time. The first is that the position of the AF-on button on the back (heavily used for back-button autofocus) is slightly different than on some other bodies. I didn’t notice this at first, but notice it more over time. It requires a slightly different thumb position to hit, and it is also easy to hit the AE-lock button if you aren’t careful. Both of these problems go away with practice, but be aware there might be a learning curve. The other gripe isn’t so much related to the camera as it is to EF lenses adapted to the RF mount. The mount adapter works great, but it does change the center of gravity slightly with respect to the lens that’s mounted, and can make it feel front-heavy. I’ve since swapped all of my EF glass for RF glass so this is no longer an issue for me, but be aware if you are adapting EF lenses.
I want to talk briefly about controls. The controls on this camera are amazingly customizable. Almost all of the buttons can be bound to something other than their default if you are so inclined. For me, the first thing I do on any new camera is enable back-button autofocus which just requires turning off focusing on the half shutter press. All of the other familiar controls are there, with two exceptions. There is no depth-of-field preview button, which I found a little annoying because on my 6d I have that button bound to switch between one-shot and servo autofocus. Over time, I’ve solved this by using the camera’s custom modes, and binding a mode for my common shooting scenarios (landscape/astro, people, wildlife). The other control that was missing was the joystick on the back. You can use the touchscreen to move the autofocus point instead, or the arrow pad. The R5 corrects both of these issues, so if they are important to you, consider that camera.
Speaking of controls, lots of people buying the R will probably end up with an RF to EF mount adapter. Even if you are only planning to get RF glass, it is useful to have a mount adapter around in case you want to rent or use an EF lens. If you get the adapter, get the one with the control ring on it. The control ring is new to the RF lenses and is a customizable ring that can be bound to any function. I bound mine to exposure compensation and found that more intuitive to use than the small dial on the top of the body. It’s also nice to have the control ring adapted for EF lenses for consistency with RF mount lenses.
I also have to talk about the viewfinder. Before I used the R, I was pretty skeptical of electronic viewfinders. After using the R, I’m completely sold. The R’s viewfinder is simply excellent. I didn’t notice any real lag in most conditions (I’ll talk about one below), even in eco mode which is supposed to save battery. The color rendition is great and the image is nice and bright. The thing that made me fall in love with the EVF though was that I could see how the image would look before I took it. The first few shots through the R, I found myself shooting and then quickly checking the LCD on the back to see if I got the exposure correct, which of course was the same as the EVF showed me. I had to train myself to trust the viewfinder, and when I did, I found myself shooting fewer images but getting more keepers because I never had a missed exposure. It was really refreshing, and hard to go back to a DSLR afterwards!

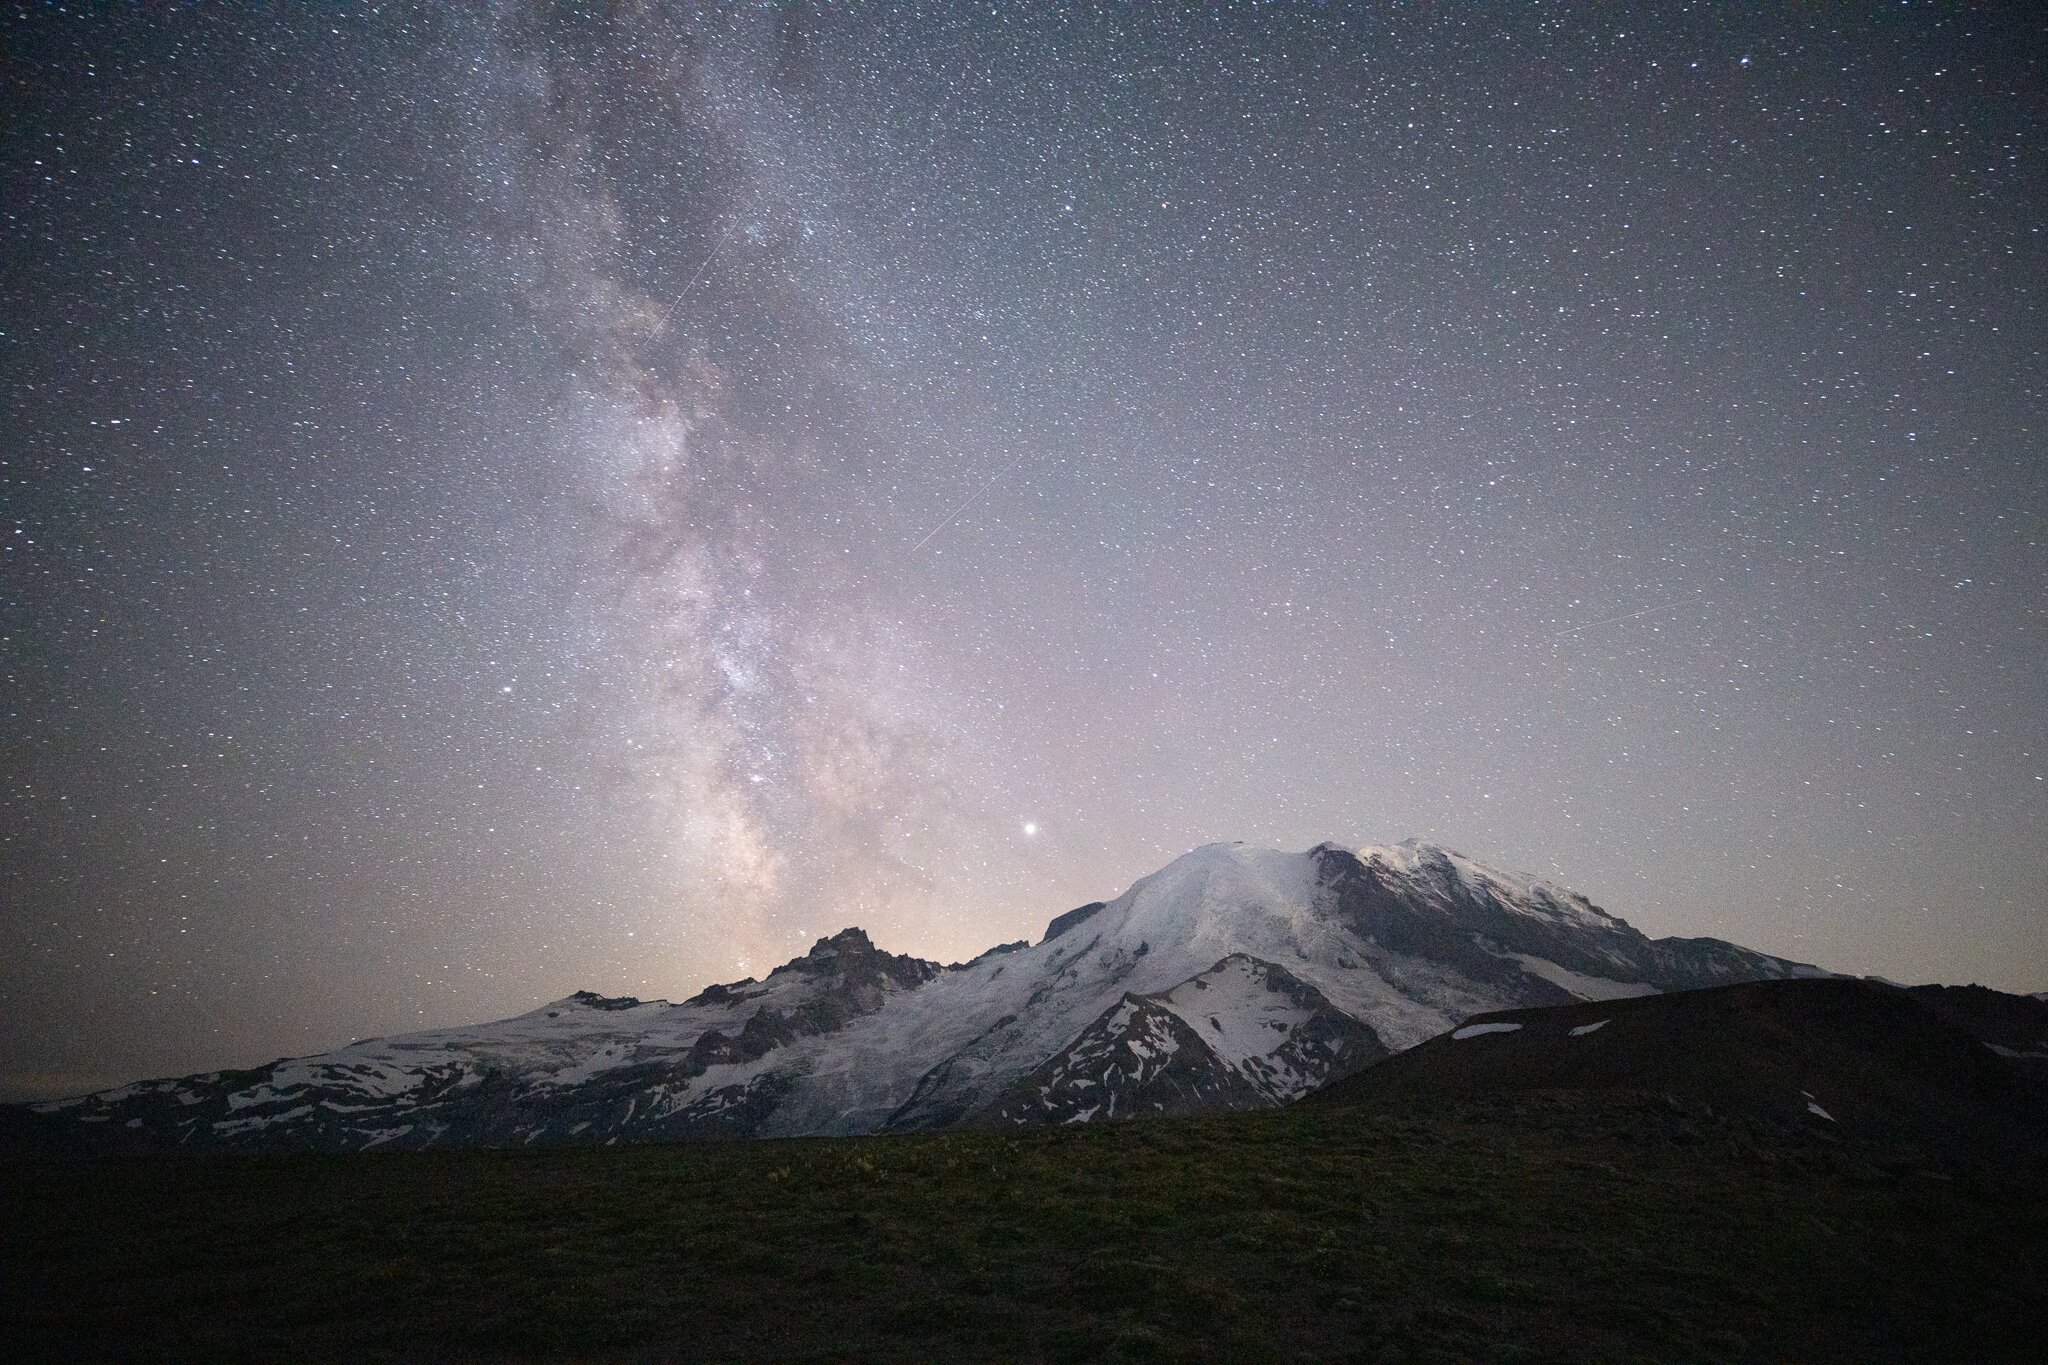
The classic view of Mt. Rainier with the Milky Way using the EOS-R. This is a composite with a tracked sky at 50mm and the foreground at 16mm.
The images this camera produces are astounding. It’s basically the same sensor as the 5d4 in a body that’s similar to a 6d. I was very pleased with the images it made, in all kinds of conditions. On paper, the sensor isn’t “the best”, but in my opinion, the images are excellent and the rest of the camera and system more than makes up for any on-paper shortcomings.
Two minor annoyances. This camera lacks a built-in intervalometer, which the cheaper RP does have. Sadly, Canon has never added this with a firmware update. It does have a built-in bulb timer though. Another annoyance is that the port you would use to plug in an intervalometer is the stereo jack type, not the wide 3 pin type that you find on the 5d and 6d. This means that if you are moving to the R from one of the other full frame Canon DSLRs, you’ll need a new intervalometer or shutter release, or an adapter cable.
Astrophotography
Let’s get into the specifics for astrophotography with this camera.
The EVF is a game-changer in terms of astrophotography in a few ways, but with a few gotchas that can be overcome. The main thing I love about the EVF is that it can do anything the big LCD can do, and in many cases do it better. One of those things is zooming and focusing. You can zoom the EVF just like the back of the LCD, and because your eye is nice and close, you get the same effect as with using a loupe on the back LCD. This allows you to very precisely see what you are doing, and for focusing, this is awesome. I was able to manually focus on faint stars entirely through the EVF with nothing required other than my eye. The EVF also has focus peaking, which shows little lines around in-focus objects, including stars. To activate it, you have to switch focus peaking on and also switch your lens into manual focus mode. It’s really handy and honestly makes focusing a breeze. I’ve since stopped carrying my loupe since the EVF is so good.
When using the EVF for astrophotography, you’ll want to tame its brightness. The brightness controls on this camera are a little non-intuitive. When you change the brightness in the menu, it only changes the brightness of the screen that is currently active. If you are like most people, you probably will use the back LCD to look at the menus. However, this means that to turn down the EVF brightness, you need to look at the menu through the EVF and look at the menu through there. It’s kind of annoying. I wish they would just add a separate control for this, as I spent way too long trying to figure this out. What I suggest doing with the back LCD is flipping it around to hide it. This not only protects it when you are out shooting, but keeps it from turning on accidentally and ruining your night vision. It also saves a lot of battery.
A final EVF gotcha is the lag at night. The EVF tries to simulate the exposure it is going to take, which is great, but in very dark conditions (e.g. Milky Way) it won’t be able to do that without some lag. Honestly this isn’t that big of a deal, but it does take a little getting used to. Plus, the EVF can see a little better than I can at night, so I was able to see something through it compared to nothing through the optical viewfinder anyhow.
I can’t talk about astrophotography without also talking about noise. This camera is excellent in that regard. ISO 1600, which is what I normally use for tracking on my 6d, was very, very clean, comparable to but better than the 6d. ISO 6400, which is typically where I’m shooting for single shot Milky Way, was significantly better than the 6d. This camera appears to be at least somewhat ISO-invariant. As a test, I made an image that was underexposed at ISO 3200. Pushed 2.5 stops in Lightroom (far more than I would normally do), there is some noise, but it is quite a bit better than I would have expected. Over time, this camera has delivered great astro images for me, and gives me enough latitude to recover the occasional missed shot. Check out some sample images in the slide show, and any recent night sky images on my web site too.
One other cool quirk of this camera that is useful for astrophotography is its autofocus. Normally, it is a bit of a challenge to get a DSLR to autofocus on the stars at night, unless you have the moon or a really bright star and a fast lens. I was able to use relatively faint stars to autofocus with the R, and more importantly, it was dead-on accurate. I was floored. Apparently this camera autofocuses down to -6 EV which is quite dark. Additionally, unlike the phase detector in a traditional DSLR autofocus system, the R’s autofocus is on-sensor. This means that it is always going to focus in the same way that the sensor sees the image. Gone are the days of doing microfocus adjustments for your lenses. This thing is deadly accurate even in demanding conditions. For me, I will always confirm and adjust focus manually if needed when shooting at night, and I’m not certain that autofocus will always work for me at night, but it’s a great tool to have in your toolbox.
One concern I had with this camera for night time work was battery life. Being a mirrorless camera, it has larger power requirements than a DSLR, purely because you can’t see anything without one of the LCDs being on, and that burns through power. Predictably, the battery life is worse than a DSLR. In a nighttime session with a moderately charged battery, I burned through it. But I can live with that, and in particular you can turn on eco mode and some other battery saver options to extend the life a little. Over time, the battery life has been more than adequate on this camera. A battery will typically last for an overnight shoot, unless I’m taking a lot of long exposures or a time lapse or something. In regular use, I routinely shoot 1000+ images on a single battery. Additionally, this thing charges with a USB-C PD hub, and I carry a small, lightweight one on overnight trips for this purpose. Basically, don’t worry about battery life. It’s a non-issue.
Landscape and wildlife

This type of image can be really dangerous to shoot with an optical viewfinder and a long lens (400mm in this case). The bright sun can very easily expose your eye to extreme brightness and cause permanent damage. With an EVF, this isn’t possible since the LCD screen can only show up to a certain brightness. You might destroy your sensor, but that’s better than destroying your eye.
I’ve used this camera a ton for landscape photography in all weather conditions and seasons. It is an absolute joy to use. I shoot in widely varying light in the mountains, including a lot of backlit images into or towards the sun, and being able to see the exposure in the EVF before I take the picture is a game changer. For challenging backlit scenes, it is a snap to adjust the exposure to ensure I wasn’t missing the mark entirely. The dynamic range on this camera is also quite good, especially compared to the aging 6d.
One other bonus with the EVF and shooting into the sun is that the risk of eye injury is mitigated. Looking through an optical viewfinder with a long telephoto lens at the sun can create some serious eye damage, so you really have to be careful when you are shooting towards the sun. You definitely don’t want to do that with any camera, but if you make a mistake with an EVF, the sensor will take any damage and the EVF will just show clipping. I like that extra margin of safety.
I mentioned autofocus earlier, and how having the focus calculated on the sensor is a game-changer. I was amazed at how good this was, even with lenses that historically don’t focus that well for me. It was like breathing new life into them. Everything I got was sharp, unless I put the focus point where I didn’t want it, but then it was on me. One gotcha that hit me at first with focus is that it is too easy to move the focus point using the four-point pad on the back of the camera. I usually use center focus and often found the point way off in the corner because I bumped the pad. Over time, this went away, but it was certainly annoying at first. Counter-intuitively, you have to first press the focus configuration button on the back and then press the trash can button to reset the focus point. Having to press a button labeled “trash” to fix the focus point was a little nerve-wracking!
I also was able to put this camera through its paces on a wildlife photography trip to Campbell River, BC just before the pandemic. I chose the R for that trip mostly as an experiment to see how it would perform in that situation. Wildlife photography isn’t my forte, but I was pretty pleased with how it did. The EVF was excellent and ensured I never had a shot under or over exposed. I mentioned this earlier, but I primarily used it with the 100-400 v2 and a 1.4x teleconverter, and never found this combination to be that awkward.

Burst mode is really essential to good wildlife images, since the difference between good and great can be just a moment. Being able to capture images as quickly as possible allows you to pick the best moment.
For wildlife, one of the more important things is autofocus. This camera did a great job at that, rarely hunting for focus. The R doesn’t have the fastest autofocus on the market, but it did an admirable job. Remember too that because it is focusing on-sensor, it was quite accurate, especially with the teleconverter. There were a few cases though where it missed focus. Some of that was purely on me, some of it was the conditions, and I think some of it was also the camera. It’s really tricky to focus on a whale that’s sticking its nose above a bunch of moving waves. There’s a lot of contrast in that scene and things to focus on, and the focus box I was using was semi-large. Later, I discovered that you can reduce the size of the focus box and I bet that would have helped.
The other consideration for wildlife is burst rate – how fast can you blast through images and how fast can they write to the card. This camera is comparable to the 5d4 in that regard, approaching 8 fps if you have exposure and focus locked. However, I kept blowing the buffer, which is when your camera’s internal buffer fills up and you can’t take any more pictures until the camera writes what’s in the buffer out to the card. It turns out the problem was I had a slow card in the camera. That’s not normally an issue for landscape or astro, but for wildlife it definitely was! I borrowed a fast UHS2 SDXC card and was able to blast away about 45 or 50 shots before blowing the buffer, and even then it cleared quickly.
If wildlife is your main thing, you should consider the R5, R6, or R3 instead, as these bodies address the shortcomings I’ve mentioned above. But for casual wildlife use, the R is perfectly fine.
The RP
I also want to talk briefly about the EOS-RP. I own one of these bodies that I bought for my wife. I’ve used it a bit and although it is quite similar to the R, it has some differences to be aware of:
Lower resolution sensor. This is rarely a deal-breaker for people that are in the market for this camera, especially at this price point.
Different battery. The RP uses a smaller battery than the LP-E6(NH) that the R and most other full-frame Canon bodies use. This is a problem for me as I have a large collection of batteries.
Lighter and smaller. This is a pro and a con. I always appreciate the lighter weight, but it is a little small in my hands.
No touch bar and no top LCD screen. The lack of a touch bar won’t be missed by most people. The missing top LCD screen is a little weird after using the mode select button on the R for a while, but it’s similar to most other bodies, so it probably won’t matter to you.
Built-in intervalometer. This is a major plus for the RP, and it is maddening that the R doesn’t have this.
Built-in focus stacking. I haven’t used this, but the RP has a focus stacking mode built-in that the R does not.
Aside from the battery, it’s a great little camera, and it can be had very cheaply. It’s otherwise really similar to the R, and if you are budget-sensitive, then you ought to consider it. One caveat is that I have not used it for astrophotography, so I can’t speak to how it performs.
Conclusions
I was and continue to be really impressed with this camera. It’s a great package that does everything I need it to do, and it takes great images.
Beyond that, it’s a really refreshing change. It’s different than a DSLR, and in many respects better, but something about it inspires creativity for me. I highly suggest renting one and see how you like it.